Course
Tracheostomy 101
Course Highlights
- In this Tracheostomy 101 course, we will learn about ventilation and respiration.
- You’ll also learn the indications for a tracheostomy.
- You’ll leave this course with a broader understanding of common tracheostomy-related complications.
About
Contact Hours Awarded: 3
Course By:
Tracey Long
PhD, MS, MSN, RN, APRN-BC, CDCES, CCRN, CNE, COI
Begin Now
Read Course | Complete Survey | Claim Credit
➀ Read and Learn
The following course content
Introduction: Case Study
Admission to ICU and Mechanical Ventilation
Juan Flores (John), a 48-year-old male Hispanic patient with limited English-speaking ability was admitted to your ICU following a serious motor vehicle accident that left his lungs collapsed, necessitating immediate intubation with mechanical ventilation support. He has been in the ICU for 10 days and has now received a tracheostomy.
- What are your responsibilities for Juan’s care?
- Why did he receive a tracheostomy?
- What do you know about tracheostomy care?
- What are the priority problems you will include in his care plan?
- What will be your considerations as you plan for his transfer to a step-down medical-surgical unit and beyond?
- How will you communicate with him?
This course will help you answer the above questions and more!
Background of Tracheostomy Use
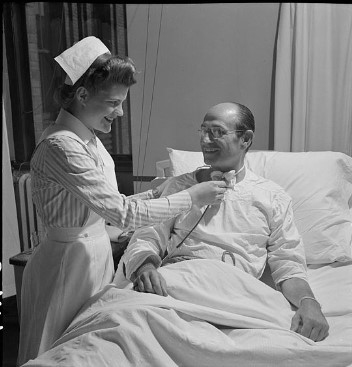
Image 1. Attending to a patient with a tracheostomy is part of nursing care (24)
Due to advances in medicine and technology, more people are living longer. Our aging population also lives longer with chronic diseases and require complex care when they come to a hospital, requiring admission to a critical care unit (4). As breathing is one of the most essential components to life, many critically ill patients require airway support including mechanical ventilation.
Documents show a tracheostomy was one of the earliest surgeries created dating back to 3600 B.C. in ancient Egypt (19). It can be a lifesaving procedure in an emergency and a life-sustaining intervention for someone with an unstable or damaged upper airway.
The Centers for Disease Control and Prevention (CDC) has declared the average life expectancy for adults in the U.S. has risen to 73.2 years of age in 2021. Of these adults, 6 out of 10 have a chronic disease or condition lasting at least one year such as diabetes, kidney disease, respiratory conditions, heart disease, cancer, and forms of dementia.
Of the chronically ill patients requiring medical attention, over 5 million are admitted to an intensive care unit (ICU) for acute monitoring of their airway, breathing, or circulation (14). Among the top reasons for admission to an ICU are respiratory failure requiring ventilator support, known as mechanical ventilation. When a patient requires long-term use of respiratory support, including mechanical ventilation, a tracheostomy may be considered to support the airway and oxygenation needs.
Studies reveal during the intensive experience of the Covid-19 pandemic that ventilator use accelerated and so did the need for tracheostomies. Clinical lessons learned included how nurses could communicate with their ICU patients, and the improved outcomes with an earlier tracheostomy rather than waiting beyond two weeks for surgical placement of a tracheostomy tube (21).
Definition of a Tracheostomy
A tracheostomy is a surgical opening in the anterior area of the trachea. The trachea is commonly known as the windpipe, which allows air to pass from the upper airway of the nose and mouth into the lungs. A tracheostomy may be surgically created in an emergency to bypass an obstructed airway, better aid respiration with mechanical ventilation, or clear secretions, which require chronic outside assistance (7).
Anatomy and Physiology Review of Respiration
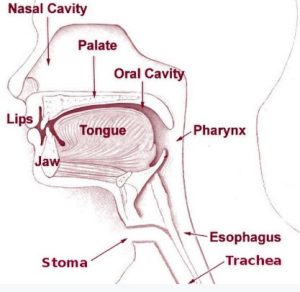
Figure 1. Head and Neck Anatomy Showing the Upper Airway (25)
The trachea is an anatomical tube that connects the larynx and mainstem of the bronchi. The trachea is made of expandable rings of cartilage surrounded by nerves, muscles, and blood vessels supplying oxygen and nutrient-rich blood. The upper airway includes the nose, nasal cavity, oral cavity, and trachea (46).
The lower airway begins at the edge of the lowest end of the trachea, which connects to the main bronchus. From there, the main bronchus divides into the right and left bronchus, which divide into smaller bronchioles and finally into hundreds of alveoli within the lungs where oxygen and carbon dioxide are exchanged.
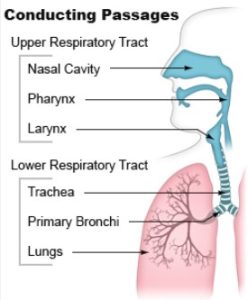
Figure 2. Air conduction passages of the upper and lower respiratory tract (26).
The anatomical landmarks of the trachea for a tracheostomy include the following:
- Thyroid notch: a midline area in the superior side of the larynx.
- Cricothyroid membrane: a depression between the cricoid and thyroid cartilage, where an emergent cricothyrotomy is done.
- Cricoid cartilage: a palpable landmark that connects the larynx and trachea, commonly where an incision is made for a tracheostomy.
- Sternal notch: identification of the thoracic inlet where an important artery lies.
The body relies on both the upper and lower airways to conduct air, which is a mixture of oxygen, nitrogen and other gases. As oxygen passes through the respiratory tract, the gases of oxygen and carbon dioxide are exchanged in the alveoli. If the upper airway is blocked, no oxygen can enter the lower airway alveoli unless an artificial opening can help, such as a tracheostomy.
The process of respiration includes the two main processes of inhalation (also known as inspiration) and exhalation. Respiration is the exchange of oxygen and carbon dioxide which occurs in the lower airway. The primary muscle that aids in inspiration during breathing is the diaphragm.
The muscles involved in normal exhalation are the intercostal muscles, which allow the chest to deflate, and air to be exhaled (10). If there is an obstruction within the trachea, oxygen cannot flow into the lungs leading to hypoxia and ultimately death.
Various methods can be used to remove an obstruction including patient-initiated coughing, or abdominal thrusts by a trained bystander. When an obstruction is due to secretions, paralysis, trauma, or mucus, additional measures need to be taken to clear the airway. Alternative airways can be inserted to secure an open airway (10, 22).

Self Quiz
Ask yourself...
- What are the anatomical organs involved in respiration?
- What is considered the upper and lower airways?
- Where are oxygen and carbon dioxide exchanged?
- What is the difference between inspiration and expiration?
- What will happen if the airway is obstructed at any level?
Alternative Airway Devices
According to the American Training Association for Cardiopulmonary Resuscitation Training, there are various alternative airways are employed to manage and protect a patient’s airway in various clinical situations (27).
Oropharyngeal airways (OPAs), which consist of curved devices placed inside a patient’s mouth to keep the tongue from blocking airways, are used to keep the upper oral airway open.
Nasopharyngeal airways (NPAs) are flexible tubes inserted through the nose that provide an open airway in cases when an oral airway may prove challenging to use.
Laryngeal mask airways (LMAs) also offer an alternative to endotracheal tubes (described below) by creating a seal over the laryngeal inlet and protecting patients in various medical situations from inadequate ventilation and oxygenation.
Endotracheal tubes (ETT) are often employed as airway devices and must be carefully placed through either mouth or nose into trachea to create an uninterrupted air passageway. An ETT is a flexible plastic tube inserted through either the mouth or nose into the trachea for airway management in critically ill patients. ETTs serve the primary function of providing open airway ventilation while aiding oxygen delivery to lungs. Intervention is typically utilized during surgical procedures; intensive care units or emergency situations where spontaneous breathing could become compromised.
ETTs offer many advantages for medical purposes, including being used to manage and support ventilation, administer medications directly into the airway and protect it from aspiration of fluids or secretions. Placement can be extremely lifesaving, however, as with many medical interventions, it comes with potential complication risks. These complications could include damage to vocal cords or tracheal mucosa during insertion, increased risk of ventilator-associated pneumonia and potential dislodgment resulting in inadequate ventilation. Therefore, careful monitoring and compliance with established protocols is crucial to avoid these potential dangers and ensure safe and efficient endotracheal tube usage in clinical environments.
According to Medline Plus and the National Library of Medicine (47, 48), endotracheal tubes are frequently the airway of choice for someone requiring mechanical ventilation and are commonly seen in an intensive care unit. Their use can be short-term such in a surgery, but then removed the same day, or they may be used for up to 4-6 weeks in an ICU setting with mechanical ventilation. Because of the potential complications, most patients who cannot be weaned from an ETT will require a tracheostomy for longer term airway management.
Each airway management tool serves a different function in providing sufficient breathing airflow and oxygenation levels in these situations. A surgical opening into the trachea, known as a tracheostomy, can provide an alternative airway and ultimately save someone’s life. The choice of an airway depends on the medical situation, skills of the medical personnel, and the patient’s condition.
The following table shows the benefits and disadvantages of each of these alternative airway devices from least invasive to most invasive, according to the American Training for CPR in 2024 (27).
| Airway Device | Benefits | Disadvantages |
| Supplemental Oxygen Devices | Provides controlled oxygen and pressure. | Is not an artificial airway and not effective without an open trachea and larynx. Airway devices, such as the ETT, LMA require supplemental oxygen. |
| Nasopharyngeal Airway (NPA) |
Bypasses the mouth and the tube goes through the nose into the larynx. Can be used in both conscious and unconscious patients.
Patients may still speak and maybe even eat. Also known as “nasal trumpet.” Made of flexible rubber. Can help with nasal suction. Must be sized to the patient. |
Contraindicated in nasal trauma or fracture. Only for temporary use. May irritate the nose. |
| Oropharyngeal Airway (OPA) |
Quick and easy “blind” insertion. Useful in emergencies. Helps prevent the tongue from obstructing the larynx in only unconscious patients.
Made of hard plastic or rubber. Can be used as a bite block and used with an ETT. Must be measured and sized for the patient. |
Can cause gag reflex resulting in vomiting. Cannot be used in a conscious patient. Patient shouldn’t speak. Not for long term use. |
| Laryngeal Mask Airway (LMA) | Less invasive than an ETT. Easier to insert. Provides a seal over the larynx for ventilation. | Risk of displacement and inadequate ventilation. Patient cannot speak with the tube inserted. |
| Endotracheal Tube (ETT) |
Provides a secure airway for controlled ventilation, generally through mechanical ventilation.
Good for emergency or longer periods of time 1 day-4 weeks. Must be sized (2.0-12.0) |
Requires skillful insertion. Can cause erosion of the nasal and lip skin and esophagus.
Possible dislocation and disconnection of tubes. Patient cannot speak with the tube. |
| Tracheostomy |
Provides direct access to the larynx for oxygen delivery. May be used long term and includes ability to speak.
Patient may be awake and without mechanical ventilation for long-term. |
Requires skillful insertion. Can cause erosion of the surrounding skin. Possible dislocation and disconnection of tubes.
Requires skillful nursing monitoring, suctioning, and cleaning. |
Table 1. Benefits and Disadvantages of Airway Devices (27)
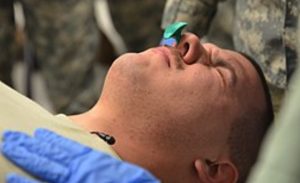
Image 2. Insertion of a Nasopharyngeal Airway (42)
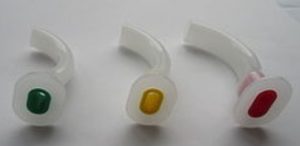
Image 3. Oropharyngeal Airway tube based on size (29)
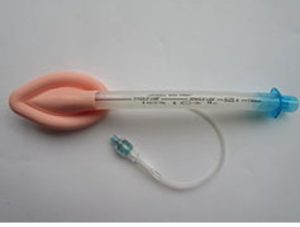
Image 4. Laryngeal Mask Airway (LMA) (30)
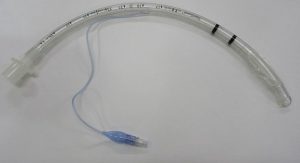
Image 5. Endotracheal Tube (31)
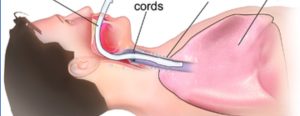
Figure 3. Endotracheal Tube inserted into the trachea for temporary airway support (32)

Self Quiz
Ask yourself...
- Which adjunct airways can be used for conscious patients?
- Which adjunct airways can only be used for unconscious patients?
- How would you decide which adjunct airway to use for a patient in respiratory distress?
- How long can a patient have an endotracheal tube?
- Which adjunct airways can a patient talk with?
Indications for a Tracheostomy
Conditions that may indicate the need for a tracheostomy include anticipation of prolonged ventilation, facilitation of weaning from a mechanical ventilator to reduce sedation, airway protection, upper airway obstruction, and failed intubation. A tracheostomy can be considered for two reasons including emergent and elective.
- An emergent tracheostomy is done during an emergency when the upper airway has become obstructed or experienced trauma that does not allow an endotracheal tube to be placed.
- An endotracheal tube is an artificial airway that is inserted through the mouth down the larynx into the trachea, which is connected to an oxygen source.
- An elective tracheostomy is a done when long-term airway support is expected such as for continued mechanical ventilation, neuromuscular disease, subglottic stenosis, head and neck cancer treatment, or facial and neck trauma which comprised the airway (19). Additional types of a tracheostomy include a planned permanent tracheostomy.

Self Quiz
Ask yourself...
- Give three examples for a tracheostomy.
- Explain the difference between an emergent and elective tracheostomy.
Benefits and Concerns of a Tracheostomy
Other than acute and active cellulitis of the anterior skin on the trachea, there are no contraindications for a tracheostomy. Some of the benefits of a tracheostomy tube is that it can be more secure than an endotracheal tube (ETT). If a person can’t speak with an ETT, certain tracheostomy tubes are available to allow the client to speak and eat orally with a tracheostomy tube (10).
Benefits of a tracheostomy when needed for airway support include (6):
- Ease of airway care and suctioning
- Facilitates communication and speech
- Increased patient comfort and psychological support
- Improvement of patient appearance (which is often very appreciated by the family)
- Easier to perform spontaneous breathing trials for weaning off a ventilation
- Eligibility to transfer out of an ICU setting
A tracheostomy may offer advantages when extended life support may be needed for extended duration. One key advantage is increased airway access, which enables efficient removal of respiratory secretions while decreasing breathing effort. Tracheostomies also allow for long-term mechanical ventilation, eliminating the need for endotracheal tubes while creating a more secure and stable airway for patients.
Tracheostomies may help patients transition off ventilatory support as their lung function returns; however, the surgery carries risks such as bleeding, infection, and damage to surrounding structures that must be considered when making such decisions (33).
Maintenance of the tracheostomy site requires rigorous attention in order to reduce infection risks and ensure optimal healing, with speech or swallowing difficulties potentially necessitating rehabilitation efforts. Tracheal stenosis poses another potential risk, in which the trachea narrows and leads to respiratory impairment. As part of the decision to perform a tracheostomy, the patient’s health status and expected duration of respiratory support, through to potential risks involved with this surgery must be considered. Care must also be provided during follow-up monitoring visits to mitigate complications and maximize benefits from having one performed.

Self Quiz
Ask yourself...
- Name two benefits of having a tracheostomy to support the airway.
- Name two disadvantages of having a tracheostomy.
- Without a tracheostomy, what are the other options for airway support?
Timing from Mechanical Ventilation to Tracheostomy
The decision to perform a tracheostomy is made after much consideration by the healthcare providers about the patient’s status, stability, and expected need for prolonged mechanical ventilation. Expected clinical outcomes from the tracheostomy is a serious consideration. Once a patient is receiving mechanical ventilation for respiratory support, the discussion of time to wean off the machine begins.
Guidelines suggest that an ETT should only be in place for less than 10 days (49). If mechanical ventilation need is anticipated beyond that, a tracheostomy should be considered. Even within 72 hours of mechanical ventilation, healthcare providers will attempt to wean the patient from the ventilator if possible. Further complications from extended mechanical ventilation increase the risk for complications. An ETT can cause laryngeal injury and patients require sedation. Prolonged sedation can cause hypotension, an ileus, delirium, respiratory depression, and reduced ability to communicate.
The patient’s fatigue, risk for pneumonia and other respiratory disorders, and mechanical ventilation dependency are all factors to be considered. Studies show that there is lower morbidity with modern tracheostomy use which has shifted the risk to benefit towards an earlier tracheostomy (34, 49).
As in many clinical decisions, a decision tree and algorithm has been established to help practitioners decide when to wean a patient from mechanical ventilation and begin a tracheostomy if needed. Nursing reports of the patient’s condition and toleration from weaning attempts are critical for decision making (34).
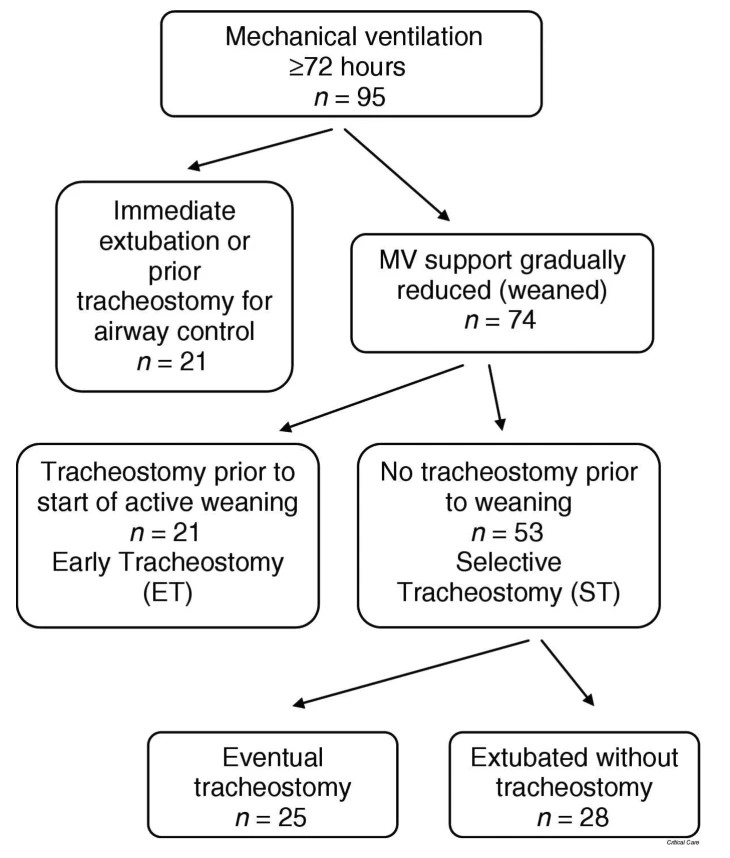
Figure 4. Tracheostomy timing and duration of weaning in patient with respiratory failure (34)

Self Quiz
Ask yourself...
- Explain the decision tree to wean an endotracheal tube.
- Who makes the decision for extubating an ETT and surgical insertion of a tracheostomy?
- What are the disadvantages of long-term ETT use?
Case Study Continued
Successful Ventilator Weaning
After 12 days on a mechanical ventilator, Juan demonstrated marked improvement in his respiratory status. Working alongside respiratory therapists, his medical team successfully weaned off his ventilator, but he still has the tracheostomy marking a critical step toward transitioning him out of acute care settings and towards further recuperation.
- What key features of tracheostomies should nurses know in order to care for and clean Juan’s trach?
- What will be part of your nurse report as he is transferred from the ICU?
Key Features of a Tracheostomy
Tracheostomy involves creating an incision in the trachea below the cricoid cartilage to establish direct airway access and establish direct lung ventilation. A device known as a tracheostomy tube must then be installed through this opening for direct lung ventilation to take effect. Its features include sizing, insertion procedure, and potential fenestration options (1).
Tube Sizing
Establishing the ideal size of a tracheostomy tube for optimal patient care is vitally important. Tube sizes differ, with selection depending on factors like patient age, anatomy, and clinical condition. Healthcare providers usually measure both the outer and inner diameters to ensure a secure fit, which will help avoid complications like air leaks, difficulty breathing or damage to tracheal walls if sized correctly.
Tubing sizes vary from a 2.0 to 20 with the outer diameter approximately 10 mm in the average size adult. Parts around the inner tracheostomy tube include cuffed, non-cuffed, double lumen tubes, tubes with speaking valves, and even metallic tubes.
The tracheostomy has a rubber plate with two slits for ties to hold it in place around the patient’s neck, a pilot balloon to inflate the cuff, which holds the tube inside the trachea, and the outer cannula. There is often information written on the plate or outer cannula such as the brand, the trach size and if its fenestrated (1, 7).
If a trach tube does have a pilot balloon, it can be used in an emergency as an airway; however, if there is no balloon for the cuff, the trach cannot be used as an emergency airway. The pilot balloon will be inflated when the cuff is inflated, and flat when the cuff is deflated. Just like inner cannulas, outer cannulas can be fenestrated or non-fenestrated. The cap on an inner cannula also can be colored red (closed) or green (open).
When the red cap is on it to allow air to travel through the trach to the vocal cords to produce speech and so is used in preparation for a trach to be removed for a patient. An obturator is a rigid plastic piece used to put a new tracheostomy tube into the trachea should it accidentally be removed. An obturator should be placed at the bedside for every patient to be available for an emergency.
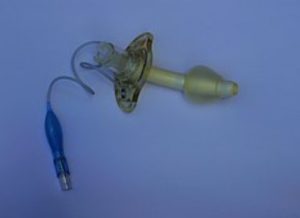
Image 6. Parts of a tracheostomy tube (35)
The Insertion Procedure
Tracheostomy tube insertion requires trained healthcare providers, usually within an operating room or intensive care environment, and involves making a precise incision in the trachea to secure airway placement, followed by carefully placing and fixing an intraluminal tube into place to secure airflow.
Providers must possess extensive knowledge regarding anatomy, sterile technique, and potential complications to perform this procedure correctly and safely. Proper fixation ensures minimal accidental dislodgement by way of tie securements or similar devices as a practiced practice. The patient must be placed supine with neck extended. An incision is made in the neck with subcutaneous fat and the platysma muscle cut. A hole is made into the trachea in the second or third cartilage ring. The tube is then inserted and the cuff around the tube should then be inflated to hold the tube in place.
Complications from surgery may include surgical emphysema, incorrect placement, airway obstruction, hypoxia, aspiration, damage to the cuff, bleeding or vascular injury, thyroid injury, and possibility of causing a pneumothorax.
Tube Features
Some tracheostomy tubes feature openings called fenestrations or slit openings in their walls that permit airflow through to allow patients to breathe through both nose and mouth and have speech. Vocal sounds come from air passing from the lower airway across the vocal cords. If no air can move past due to a non-fenestrated tube, the patient won’t be able to speak.
Fenestrations may prove particularly helpful when weaning off mechanical ventilation while aiding speech and swallowing rehab therapy; however, their use must be carefully considered based on individual clinical requirements. With time, some patients who will have a long-term or permanent tracheostomy may advance to a fenestrated tube and learn how to speak again.
According to Tracheostomy Education, tracheostomy tubes have several parts including the hub, flange, outer cannula, inner cannula, cuff, pilot balloon, and inflation line (36).
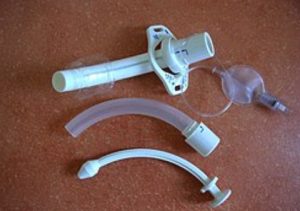
Image 7. Components of a tracheostomy tube (37)
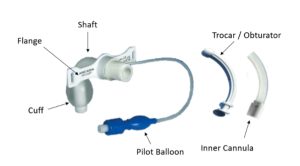
Figure 5. Tracheostomy components (38)
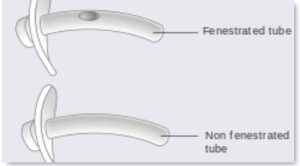
Figure 6. Fenestrated tracheostomy tubes have holes or slits to allow air passage for speech (39)
Tracheostomy tubes can be either metal or plastic. Today, more commonly a plastic Shiley tracheostomy tube is used, which comes in sizes from 4 mm to 10 mm. The beneficial features are the disposable and reusable inner cannula options for easy cleaning. The larger the number the smaller the diameter of the trach tube, which is similar to IV cannulas.
The inner cannula is generally changed every 24 hours for a hospitalized patient. The single lumen tracheostomy should be changed every 7-14 days for cleaning and to prevent tube blockage from secretions and mucus (8). As always, nurses should follow the manufacturer’s guidelines and hospital protocols and procedures.

Self Quiz
Ask yourself...
- What is the purpose of a fenestrated tube?
- What nursing interventions are required for caring for a patient with a tracheostomy tube on a ventilator?
- How can patients be involved in the decision-making for a tracheostomy?
Preparing a Patient for a Tracheostomy
The surgical incision is generally completed in an operating room but in an emergency can be done at the bedside, in an emergency department for example. It generally requires two skilled medical providers who work together to perform anesthesia and surgical incision of the trachea, and visualize the tube into the trachea through the use of a bronchoscope. The patient should give written consent, if possible, and given medical explanations of the procedure, potential complications, and options.
Once in the operating room, the patient is placed in supine position with the head and neck extended for best visualization of the neck. General or local anesthesia are given depending on the patient’s situation. During the procedure, as in all surgeries, airway and vital signs are monitored closely to support the patient’s safety (17, 19). The two surgical techniques are an open tracheostomy directly into the trachea and the percutaneous tracheostomy, which is modified under bronchoscopic guidance. The percutaneous tracheostomy is preferred due to less complications.
Potential complications for either procedure include the most common complication of bleeding, tracheal laceration, aortic injury, and esophageal perforation. Complications after the surgery include infections, acute obstruction of the airway, skin irritation, or ulceration and necrosis caused by chronic use of the cuff of the tracheostomy tube. Cuff pressure to keep the tracheostomy tube in place should ideally be maintained at 20-25 mm Hg range. Overinflation can cause tissue damage and too little cuff pressure may cause dislodgement of the tube and potential collapse of the airway (1). Post-surgical nursing duties include continual monitoring of the airway, bleeding, stability of vital signs and patient’s consciousness or needed sedation. The tracheal tube is then attached to either a mechanical ventilator or oxygen source.
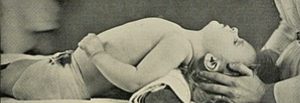 Image 8. Patient is placed supine with neck extended for better visualization of the trachea before surgery (40)
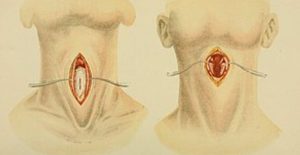 Image 9. Subcutaneous skin and the platysma muscle are separated to expose the trachea for tracheostomy tube insertion (41)
Nursing Assessment of a Tracheostomy
A careful nursing assessment using clinical judgment is a critical component to good patient outcomes with a tracheostomy. Nursing assessment of patients with tracheostomies involves performing a careful examination both of the site of placement and the patient’s overall respiratory state.
Tracheostomy Site Assessment Nurses should assess:
- Tube placement
- Stoma condition
- Securement devices (ties)
- Tube Size
Nurses begin by verifying the secure placement and appropriate positioning of the tracheostomy tube within the trachea, checking for signs of dislodgment or malposition. Condition evaluation for the tracheostomy stoma includes looking out for any signs of infection, redness, swelling or discharge. Additional focus should be paid towards maintaining cleanliness and skin integrity around the stoma. Ties or securement devices must be thoroughly examined to ensure their fixation without creating skin irritations or pressure injuries. Having extra supplies such as an extra trach tube, insertion cannula, and obturator at the bedside are standards for emergency preparation (8, 11).
Respiratory Assessment A respiratory assessment includes monitoring breathing pattern characteristics such as respiratory rate and depth effort. Breath sounds are examined in all quadrants to detect abnormalities. Respiratory secretions are evaluated, with suctioning performed as necessary to maintain airway patency and airway patency. Nurses checking cuff inflation pressure regularly is designed to avoid aspiration in patients equipped with inflatable tracheostomy tubes, preventing aspiration.
Patient Comfort and Communication Attention is paid to the patient’s ability to speak, particularly if a fenestrated tracheostomy tube is being utilized. Communication methods like writing or using devices for communication devices may be encouraged as needed. The nurse needs to assess the patient’s preference for communication devices and adapt to their needs. Patient comfort is another primary goal. Nursing assessments should be performed for any pain or discomfort related to either the tracheostomy procedure or the tie-securing process. Psychological support and education services should be provided, to address potential impacts associated with living with a tracheostomy, and support services are extended to patients as well as their immediate family members (5, 12)
Infection Control Infection control measures includes emphasizing hand hygiene among healthcare providers, family and visitors, and patients. The nurse should assess for any signs of infection around the tracheostomy stoma site. Equipment care that ensures proper cleaning and handling of tracheostomy components and supplies is essential. Regular cleaning and maintenance of tracheostomy equipment are integral parts of nursing care plans for managing tracheostomies successfully. Regular assessments combined with effective communication ensure optimal success when managing this complex procedure.

Self Quiz
Ask yourself...
- What nursing actions are a priority when caring for a patient with a tracheostomy to prevent infection?
- What nursing action is a priority when suctioning a tracheostomy to maintain airway patency?
- What classic signs of potential infection around a tracheostomy stoma site should the nurse assess?
- What are foundational nursing interventions for caring for a tracheostomy patient?
Case Study Continued
Transition to Medical Surgical Unit and Tracheostomy Tube Cleaning
Juan was transferred to a medical surgical unit where the focus of care for him and his tracheostomy was to ensure continued recovery and prevent complications. Nurses regularly performed cleaning of Juan’s tracheostomy tube to maintain proper hygiene while respiratory therapists monitored his respiratory function closely, providing support as necessary.
- What is the process for cleaning Juan’s tracheostomy?
- What equipment is needed?
- Is this a sterile or clean procedure?
- What position does Juan need to be in and is oxygen required?
- What education should you provide to Juan before, during, and after the procedure?
Nursing Management of a Tracheostomy
Taking care of the actual tracheostomy requires technical nursing skills. Physical nursing care for those living with tracheostomies requires a careful approach in order to safeguard both respiratory health and overall wellness of patients.
Nurses play an integral part in managing hygiene standards for the tracheostomy device as well as monitoring for complications while improving patient comfort. Regular cleaning of the tracheostomy site is key for avoiding infection, with special consideration paid to both inner and outer cannulas. Nurses should assess and manage tube placement as part of an assessment plan to ensure proper alignment while securely fastening it with appropriate ties.
The following are sterile procedure steps in cleaning a tracheostomy. Remember this is a sterile procedure and sterile technique must be followed remembering which hand will be “non-sterile” and which will become the sterile-only hand. Try to avoid using the term “dirty hand” as patients and family members may think you are changing their tracheostomy with dirty hands (9).
Perform this same procedure if the cleaning is done in a hospital setting or at the patient’s home. Family members and caregivers can be taught how to replace and clean the tracheostomy tube as well as following these steps (15):
1. Gather Supplies: Some facilities have a tracheostomy cleaning kit which contains all the needed supplies. Other facilities may require nurses to bring in each item “a la carte.”
- Clean & sterile gloves
- Hydrogen peroxide or saline solution
- A clean, dry towel
- Pipe cleaners or a small brush designed for tracheostomy tubes
- Spare tracheostomy tube, and obturator for emergency placement
- Trach collar to deliver oxygen during the procedure
2. Wash Your Hands
- Ensure your hands are clean before handling any tracheostomy equipment. Sterile gloves should used to insert the new sterile cannula.
3. Prepare the Workspace
- Set up a clean, well-lit area to perform the cleaning and provide a waste basket close by to avoid reaching over the patient or over a sterile area.
4. Remove the Old Inner Cannula
- If your tracheostomy tube has a removable inner cannula, carefully remove it while protecting the airway and providing oxygen via a trach collar. Pay attention to the printed information on the outer cannula such as trach size.
5. Clean the Inner Cannula
- Soak the inner cannula in hydrogen peroxide or saline solution for the recommended time.
- Gently brush the inner cannula using a pipe cleaner or a specialized brush.
- If a trach kit includes a new disposal kit simply discard the old inner cannula and replace the new sterile inner cannula.
6. Clean the Outer Cannula
- Use a separate brush or pipe cleaner to clean the outer cannula and rinse with clean sterile water. Make sure excess water does not enter the actual trach. Inspect the cannula for any damage.
7. Dry and Replace
- Pat the tubes dry with a clean, dry towel.
8. Reattach and Secure the Tracheostomy Tube
- Reattach the tracheostomy tube securely. Listen for the “click” to confirm secure placement.
9. Secure the Tracheostomy Tie
- Ensure the tracheostomy tie is secure but not too tight. This helps prevent movement of the tube. Some facilities now use a Velcro-like necktie which may be easier.
- Replace a clean “Y” slit gauze under the trach to protect the stoma. Avoid any loose threads from a standard 4×4 gauze pad.
10. Document the Procedure
- Confirm the patient is comfortable and able to breathe correctly through the tube. The trach collar may or may not be removed based on the patient’s condition and provider’s order. Record the date and details of the cleaning procedure for future reference.
Case Study Continued
Care plan for Tracheostomy Patient
Remember, Juan was transferred to a medical surgical unit where nurses are cleaning his tracheostomy, and respiratory therapists are monitoring his respiratory function. You are now the nurse assigned to care for Juan.
- What priority problems will you add in Juan’s care plan?
- What will you do to support his airway and respiratory efforts?
- What will you do if he can’t breathe well?
- What education will you provide to the patient about his tracheostomy?
- What education will you provide to the family members about a tracheostomy?
Nursing Care for a Patient with a Tracheostomy
Competently caring for the physical tracheostomy is only part of nursing care. The patient behind the tracheostomy tube requires additional compassionate nursing care. Monitoring the respiratory status is of critical importance and involves regular assessments of breathing patterns, lung sounds and signs of respiratory distress.
Nurses collaborate with respiratory therapists in suctioning airways, clearing secretions, and maintaining optimal oxygenation levels to provide maximum patient benefit. Patient education on how to effectively care for their own tracheostomy, should they require it long-term, includes suction techniques and how to recognize signs of complications.
Nurses also ensure the comfort of patients by assessing and managing pain, providing proper humidity of inspired air, and encouraging effective communication methods with individuals living with tracheostomies. Regular assessment, communication, and multidisciplinary approaches play a significant role in providing nursing care to these individuals for successful respiratory management and rehabilitation programs (7, 8, 9).
The systematic and stepwise care respiratory concerns for a patient with a tracheostomy can be addressed with the following trouble shooting interventions.
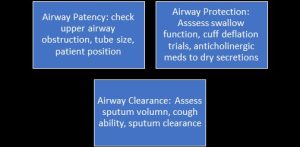
Figure 7. Trouble shooting interventions for respiratory concerns in patients with a tracheostomies
Prioritized nursing problems and goals for patients living with tracheostomies include (43):
- Maintaining airway patency
- Preventing and addressing complications of respiration
- Improving respiratory function and oxygenation
- Providing effective communication for the patient and family
- Preventing infection
- Providing adequate nutrition and hydration
- Providing emotional and psychological support for the patient
- Collaborate with the interdisciplinary team for coordination of care
Each of the above priority problems involves a separate nursing care plan and interventions as follows (20):
| Priority Problem | Nursing Interventions |
| Maintain Patent Airway |
|
| Support Breathing and Gas Exchange |
|
| Promote Effective Communication Methods |
|
| Prevent Aspiration and Dysphagia |
|
| Infection Prevention |
|
| Promote Safety and Injury Prevention |
|
| Decrease Patient and Caregiver Anxiety |
|
| Provide Patient/Family/Caregivers Education |
|
|
Provide adequate nutrition and hydration
|
|
Table 2. Example of Care Plan for Patients with Tracheostomies
Case Study Continued
Rehabilitating Speech with Fenestrated Tracheostomy Tube
Juan progressed well and speech therapists introduced strategies utilizing a fenestrated tracheostomy tube, which allowed air to pass freely between his vocal cords, helping restore some level of speech for him. Therapy sessions focused on articulation exercises which empowered Juan verbally while improving communication abilities.
- Until he can speak well what communication strategies will you use to help Juan communicate?
- What additional resources will you need for his limited English-speaking ability?
- How will you communicate with the family and his future caregivers?
Communicating with a Tracheostomy Tube
Nurses play an essential part in supporting communication for those living with tracheostomy tubes, supporting social connection and emotional wellbeing. Nurses may use various communication strategies when treating patients who cannot speak conventionally due to tracheostomy tube insertion, including using alphabet boards, communication cards, bells and alarms, mouthing, writing on paper or a whiteboard, use of gestures and sign language, tablet and smart phone apps, or electronic speech-generating devices (5).
These tools enable patients to effectively express their needs and significantly reduce anxiety and fear of their future (16). Nurses work alongside speech therapists to explore alternative communication methods that make patients feel understood and engaged with.
Utilizing fenestrated tracheostomy tubes allows nurses to further increase patients’ speaking capabilities. Fenestrated tubes feature small openings called fenestrations in their walls that allow airflow through vocal cords for phonation, allowing patients to produce sounds and regain some degree of speech. This device helps users regain some degree of speech.
Nurses work collaboratively with both patients and speech therapists to assess whether using a fenestrated tube would meet an individual’s respiratory and communication needs. By utilizing fenestrated tracheostomy tubes and communication devices, nurses contribute significantly to helping their patients regain the ability to express themselves verbally. This creates an increased sense of empowerment and connection during the recovery processes (17).
Transferring Patients
Transferring patients with tracheostomies from an ICU setting to a nursing home (or their own home) requires careful consideration and assessment of several concerns to ensure safe transitioning. Within an ICU environment, intensive medical treatment may have been provided, so as the patient progresses toward less acute settings, several factors must be kept in mind. Eligibility of transferring out of an ICU setting includes ensuring stability of the respiratory status and continuity of care.
The less intensive nursing care unit must be able to provide competent airway assessments, maintain airway patency, perform regular sterile tube changes, and manage potential complications. Ongoing respiratory monitoring, infection control, nutritional and hydration support, safe mobility, and appropriate rehabilitation services must be included in the new unit or facility (4, 9).
Continuity of care includes a medication reconciliation and care plan updates with the new nursing care. Clear communication between the ICU nurses and the new caregivers and/or nurses is needed to achieve the best patient outcomes and decrease anxiety from a previous routine in the old unit. These same guidelines apply for a patient transferring from ICU to a medical-surgical unit, nursing home, or the patient’s own home.
Ideally the patient may be weaned from the mechanical ventilator prior to being transferred out of the ICU before transferring to a new unit. Helping a patient transition from full nursing care for a tracheostomy to capping it off, advancing to speech training, and eventually removing the tracheostomy after intensive medical care is ideal. For many patients, a long-term tracheostomy may be needed, and variations of support will continue.
Case Study Continued
Multidisciplinary Team Collaboration and Transfer to a Nursing Home
Collaboration among Juan’s multidisciplinary team proved essential in planning his transition to a nursing home. With the help of physicians, nurses, therapists, and social workers, Juan’s respiratory needs and overall care were fully addressed. Family members and caregivers received education on caring for Juan at home. The care team anticipated that his tracheostomy would be terminated within the next few weeks.

Self Quiz
Ask yourself...
- What are the eligibility requirements to terminate the need for a tracheostomy?
- What patient and family education will be needed?
- What are the different pathways for outcomes for a patient with a tracheostomy?
- During a patient transfer, what is the transport team’s responsibility in maintaining the safety of a patient with a tracheostomy?
Multidisciplinary Team Collaboration
In a systematic review, the effectiveness of interprofessional tracheostomy teams made a difference in the overall patient recovery, adjustment, and clinical outcomes (44). Utilizing an interdisciplinary team is key for providing comprehensive tracheostomy care both inside and outside of the hospital setting. An interdisciplinary approach within hospitals includes collaboration among various healthcare professionals such as physicians, nurses, respiratory therapists, speech therapists, physical therapists, and dietitians (2, 3, 5).
Each member of the tracheostomy care team brings expertise to address different aspects of care. Physicians oversee medical management and make decisions regarding placement. Nurses play an indispensable part in day-to-day care by monitoring respiratory status and assuring good hygiene practices. Respiratory therapists play an integral role by managing airways, supporting ventilator use, and helping implement weaning protocols.
Speech therapists specialize in developing communication strategies for cases involving speaking valves or fenestrated tracheostomy tubes, among other devices. Research shows that the interdisciplinary team can assist with improving swallowing (2). Physical therapists specialize in mobility and rehabilitation needs while dietitians offer nutritional assistance. Even as patients transition out of hospitals into rehabilitation centers, nursing homes or their own homes, the multidisciplinary team continues to play an essential part.
Communication among healthcare providers, patients, and caregivers becomes even more crucial in home healthcare environments. Home healthcare professionals such as visiting nurses, respiratory therapists, and occupational therapists play an essential role in providing ongoing care to ensure continuity.
Family and caregivers frequently become integral parts of the team, receiving training on care practices for tracheostomies, emergency procedures, and ongoing support services. At community-based care facilities, primary care physicians, social workers, and other specialists may work collaboratively with one another to address multiple aspects of a patient’s well-being. Working as an interdisciplinary team ensures an all-around, patient-centric approach to tracheostomy care.
Regular team meetings provide opportunities for information sharing, care plan updates, and any emerging concerns to be discussed and resolved quickly. This collaborative model leverages each team member’s expertise for improved patient outcomes, quality of life enhancement, and seamless care transition between environments.
Case Study Continued
Tracheostomy Removal and Returning Home
Juan’s respiratory function had improved significantly with rehabilitation efforts, prompting his multidisciplinary healthcare team to determine that it was time for his tracheostomy removal. With continued support, he successfully adjusted to breathing independently while returning home. John’s journey from initial trauma and dependence on ventilator to speech recovery and eventual return home exemplifies collaborative, patient-centric healthcare provided throughout his recovery.
- What psychosocial concerns should be addressed before Juan’s transfer to his home?
- What resources could be shared with him and his family for his recovery?

Self Quiz
Ask yourself...
- What is good practice when transferring a patient with a tracheostomy between nursing units?
- What information needs to be included in the nurse transfer report?
- What is a potential problem associated with poor communication within the interprofessional team during a patient transfer?
Tracheostomy Pathways
Best practices in tracheostomy care require protocols, interdisciplinary engagement, and patient and family education. Evidence shows that a standardized pathway and careful plan for discharge significantly reduces the intensive care length of stay from 21 to 10 days and decreases the rate of ICU readmissions (13). The stepwise tracheostomy care should be patient centered, interdisciplinary, systematic, and coordinated for best results.
The pathway for patients with a tracheostomy may differ based on each patient’s clinical condition and expected duration of use of their device. One possible approach involves decannulation, which is when the patient’s respiratory function has sufficiently improved, and their tracheostomy tube can be removed.
Decannulation usually follows an extended weaning process in which the patient’s ability to breathe independently, manage secretions effectively, and sustain oxygenation is carefully assessed and progresses.
This pathway may be appropriate for patients recovering from surgery or critical illness who require temporary respiratory support; however, in other instances they may transition onto a pathway leading towards permanent tracheostomy use. The decision to remove a tracheostomy tube is dependent on several factors including the discontinuance of mechanical ventilation, the patient’s cognition, airway clearance, and patient’s ability to cough effectively and swallow safely. An example of the decision tree is as follows:
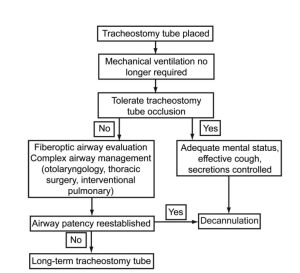
Figure 8. Decannulation Pathway (45)
Individuals suffering from chronic respiratory conditions, neuromuscular disorders, or irreversible airway obstruction may find the tracheostomy a permanent solution to improve breathing. In such instances, the trach becomes an indispensable aid that allows breathing.
Steps towards long-term tracheostomy usage require comprehensive management of respiratory and airway needs, including regular tube changes, respiratory therapies, and monitoring for potential complications. Patients following this pathway usually need comprehensive support from an interdisciplinary team in terms of respiratory care. They also need communication strategies, mobility assistance, and help managing overall quality of life issues.
Both pathways consider each patient’s personal goals of care, preferences, and overall health status when designing care plans. Decision-making must involve collaboration among healthcare providers, patients, and families so that any chosen path fits with an individual’s medical condition and long-term objectives (13, 18).
Regular assessments and adjustments to care plans reflect the ever-evolving nature of tracheostomy management. The goal is for the chosen pathway to optimize respiratory function, improve quality of life, and meet specific healthcare requirements whether that involves decannulation or permanent placement of the device.
Living with a tracheostomy tube requires careful collaboration with the interdisciplinary team, especially the family and home caregivers. With time and experience, the family and caregivers can become like experts in the care of the tracheostomy. They can learn tracheostomy care, and help the patient make the needed modifications to continue with a worthwhile life (3).
Remember as healthcare providers, we are just guests in the lives of our patients while they may be adjusting to a whole new world during and with a tracheostomy.

Self Quiz
Ask yourself...
- What are the potential complications of having a tracheostomy?
- What resources can you provide to a family who is receiving their loved one back at home now with a tracheostomy?
- What factors are considered if a tracheostomy is to be removed?
Key Terms
The following are key terms in the care of patients with tracheostomies (46):
- Emergent tracheostomy: surgical procedure opening the trachea done during an emergency when the upper airway has become obstructed or experienced trauma.
- Endotracheal tube: an artificial airway that is inserted through the mouth down the larynx into the trachea, which is connected to an oxygen source.
- Decannulation: when the patient’s respiratory function has sufficiently improved and the tracheostomy tube can be removed.
- Fenestrations: slit openings in the walls of a tracheostomy tube that permit airflow through to allow patients to breathe through both nose and mouth.
- Laryngeal mask airways (LMAs) also offer an alternative to ETTs by creating a seal over the laryngeal inlet and protecting patients in various medical situations from inadequate ventilation and oxygenation.
- Nasopharyngeal airways (NPAs): flexible tubes inserted through the nose that provide an open airway in cases when an oral airway may prove challenging to use.
- Oropharyngeal airways (OPAs): consist of curved devices placed inside a patient’s mouth to keep the tongue from blocking airways, are used to keep the upper oral airway open.
- Respiration: the exchange of oxygen and carbon dioxide, which occurs in the lower airway and alveoli.
- Stoma: a surgical opening.
- Tracheostomy: a surgical opening in the anterior area of the trachea. A stoma is a surgical opening.
- Trachea: commonly known as the windpipe, which allows air to pass from the upper airway of the nose and mouth into the lungs.

Self Quiz
Ask yourself...
Final Reflection Questions
- What is the role of each member on the interdisciplinary team caring for a patient with a tracheostomy?
- What are methods of communication for the patient with a tracheostomy?
- What is the primary purpose for using a speaking valve with a tracheostomy?
- When assisting a patient with tracheostomy tube removal, what actions should the nurse prioritize?
- What is the primary role of the nurse when preparing a patient with a tracheostomy for discharge to home?
- What is priority nursing education for someone who just had a removed tracheostomy?
References + Disclaimer
- Al-Shathri, Z., Susanto., I., Percutanenous Tracheostomy. Semin Respir Crit Care Med. Dec;39(6): 720-730.
- Bartow, C. (2020, July 25). Can a multidisciplinary trach team improve swallowing in patients with a tracheostomy? Dysphagia Cafe. https://dysphagiacafe.com/2020/07/25/can-a-multidisciplinary-trach-team-improve-swallowing-in-patients-with-a-tracheostomy/
- Daraie, S., Hasanvand, S., Goudarzi, F., & Rassouli, M. (2021, March 5). Gaining Experience Over Time: The Family Caregivers’ Perception of Patients with a Tracheostomy in Home Care. https://www.ncbi.nlm.nih.gov/pmc/articles/PMC8132866/
- Dirkes, S. M., & Kozlowski, C. (2019). Early mobility in the intensive care unit: Evidence, barriers, and future directions. Critical Care Nurse, 39(3), 33-42. https://doi.org/10.4037/ccn2019654
- Haring, C. T., Farlow, J. L., Leginza, M., Vance, K., Blakely, A., Lyden, T., Hoesli, R. C., Heft Neal, M. E., Brenner, M. J., Hogikyan, N. D., Morrison, R. J., & Casper, K. A. (2021, June). Effect of Augmentative Technology on Communication and Quality of Life After Tracheostomy or Total Laryngectomy. Otolaryngology-Head and Neck Surgery, 167(6). https://doi.org/10.1177/01945998211013778
- Hebert, L. M., Watson, A. C., Madrigal, V., & October, T. W. (2018, December 1). Discussing Benefits and Risks of Tracheostomy: What Physicians Actually Say. 2024. https://www.ncbi.nlm.nih.gov/pmc/articles/PMC5716895/
- Hyzy, R. and McSparron, J. (2022) Tracheostomy: Rationale and Contraindications. UpToDate.
- Johnson, W. A., & Mosenifar, Z. (2022, February 7). Tracheostomy Tube Change: Background, Indications, Contraindications. https://emedicine.medscape.com/article/1580576-overview#a1
- Karaca, T., Altinbas, Y., & Aslan, S. (2019, March 18). Tracheostomy care education and its effect on knowledge and burden of caregivers of elderly patients: a quasi-experimental study. Scandinavian Journal of Caring Sciences, 33(4), 878-884. https://doi.org/10.1111/scs.12684
- Lindman, J. P., & Soo, G. W. (2021, October 12). Tracheostomy: Background, Indications, Contraindications. https://emedicine.medscape.com/article/865068-overview#a1
- Mehta, A., & Chamyal, P. (2017, June). Tracheostomy Complications and Their Management. Medical Journal, Armed Forces India, 55(3). https://doi.org/10.1016/S0377-1237(17)30440-9
- Modrykamien, A. M. (2019). Strategies for communicating with conscious mechanically ventilated critically ill patients. Baylor University Medical Center Proceedings, 32(4). https://doi.org/10.1080/08998280.2019.1635413
- Nakarada-Kordic, I., Patterson, N., Wrapson, J., & Reay, S. D. (2018). A Systematic Review of Patient and Caregiver Experiences with a Tracheostomy. Patient, 11, 175-191.
- National Center for Chronic Disease Prevention and Health Promotion, 2021.
- Ng, J., Hamrang-Yousefi, S., & Agarwal, A. (2022, July 25). Tracheostomy Tube Change – StatPearls – NCBI Bookshelf. https://www.ncbi.nlm.nih.gov/books/NBK555919/
- Pandian, V., Cole, T., Kilonsky, D., Holden, K., Feller-Kopman, D. J., Brower, R., & Mirski, M. (2019, August). Voice-Related Quality of Life Increases With a Talking Tracheostomy Tube: A Randomized Controlled Trial. The Laryngoscope, 130(5). https://doi.org/10.1002/lary.28211
- Parker, L. C. (2014, November). Tracheostomy Care. Nursing Critical Care, 9(6), 38-41. https://doi.org/10.1097/01.CCN.0000453466.57833.dd
- Physiopedia. (2020). Tracheostomy Weaning. Physiopedia. Retrieved January 13, 2024. https://www.physio-pedia.com/Tracheostomy_Weaning
- Raimonde, A. J., Westhoven, N., & Winters, R. (2023, July 24). Tracheostomy. https://www.physio-pedia.com/Tracheostomy_Weaning
- The Royal Children’s Hospital Melbourne. (2022). Clinical Guidelines (Nursing): Tracheostomy management. The Royal Children’s Hospital. Retrieved January 8, 2024. https://www.rch.org.au/rchcpg/hospital_clinical_guideline_index/Tracheostomy_management/
- Swain, S. K., Das, S., & Padhy, R. N. (2022, June). Performing Tracheostomy in Intensive Care UnitA Challenge during COVID-19 Pandemic. Siriraj Medical Journal, 72(5).
- Tracheostomy Education. (2019). Swallowing Management Of Individuals With Tracheostomy. Tracheostomy Education. Retrieved January 10, 2024. https://tracheostomyeducation.com/blog/swallowing-management-of-individuals-with-tracheostomy/
- File:Wikipedystka Salicyna 2021-08-25.jpg|Wikipedystka_Salicyna_2021-08-25
- Wikimedia Commons. File: Attending a tracheotomy case is part of the training 8b07789v.jpg|Attending_a_tracheotomy_case_is_part_of_the_training_8b07789v
- Wikimedia Commons. File:Head neck tracheostomy.jpg|Head_neck_tracheostomy
- Image Source: National Cancer Institute https://training.seer.cancer.gov/anatomy/respiratory/passages/
- American Training Association for CPR. Alternative Airway Devices. Retrieved from https://www.uscpronline.com/bls/advance-airway-devices. January 18, 2024.
- Endotracheal Intubation. Medline Plus (2024). Retrieved from https://medlineplus.gov/ency/article/003449.htm#:~:text=Endotracheal%20intubation%20is%20a%20medical,is%20placed%20through%20the%20mouth. January 18, 2024.
- Wikimedia Commons. Oropharyngeal Airway tube. File:Oral Airways (3).JPG|Oral_Airways_(3)
- Wikimedia Commons. Laryngeal Mask Airway. File:LMA Adult size 4.JPG|LMA_Adult_size_4
- Wikimedia Commons. Endotracheal Tube. File:Endotracheal Tube (2).JPG|Endotracheal_Tube_(2)
- Wikimedia Commons. Endotracheal Tube Inserted. File:Endotracheal Tube.png|Endotracheal_Tube
- Hebert LM, Watson AC, Madrigal V, October TW. Discussing Benefits and Risks of Tracheostomy: What Physicians Actually Say. Pediatr Crit Care Med. 2017 Dec;18(12):e592-e597. doi: 10.1097/PCC.0000000000001341. PMID: 28938289; PMCID: PMC5716895.
- Tracheostomy timing and duration of weaning in patient with respiratory failure. Image source: https://ccforum.biomedcentral.com/articles/10.1186/cc2885. Retrieved January 18, 2024.
- Wikimedia Commons. Parts of a Tracheostomy Tube. File:Cuffed inflated tracheotomy tube.png|Cuffed_inflated_tracheotomy_tube
- Tracheostomy Training (2024). Retrieved January 18, 2024 from https://tracheostomyeducation.com/tracheostomy-tubes/
- Wikimedia Commons. Parts of a Tracheostomy Tube. File:Trachealkanüle.jpg|Trachealkanüle
- Parts of a Tracheostomy tube. Image Source: https://www.emra.org/emresident/article/cc-devices-tracheostomy-tubes
- Wikimedia Commons. Fenestrated tracheostomy tubes. File:Diagram showing a fenestrated and a non-fenestrated tracheostomy tube CRUK 066.svg|Diagram_showing_a_fenestrated_and_a_non_fenestrated_tracheostomy_tube_CRUK_066.
- Wikimedia Commons: Tracheostomy surgical position. An American text-book of the diseases of children. Including special chapters on essential surgical subjects; orthopaedics, diseases of the eye, ear, nose, and throat; diseases of the skin; and on the (14756317796).jpg
- Wikimedia Commons: Tracheostomy placement. File:Fig. 116. Low tracheotomy. Fig. 117. Thyrotomy.jpg|Fig._116._Low_tracheotomy._Fig._117._Thyrotomy
- Wikimedia Commons: Nasopharyngeal Airway. File:U.S. Army Spc. Joseph McMaster, with the 356th Broadcast Operations Detachment receives a nasopharyngeal airway tube, during the combat lifesaver course, a pre-mobilization class at Joint Base 140111-A-RB175-611.jpg|U.S._Army_Spc._Joseph_McMaster,_with_the_356th_Broadcast_Operations_Detachment_receives_a_nasopharyngeal_airway_tube,_during_the_combat_lifesaver_course,_a_pre-mobilization_class_at_Joint_Base_140111-A-RB175-611
- Parker, Laura C. MSN, RN, CCRN. Tracheostomy Care. Nursing Critical Care 9(6):p 38-41, November 2014. | DOI: 10.1097/01.CCN.0000453466.57833.dd. Retrieved on January 18, 2024 from https://journals.lww.com/nursingcriticalcare/fulltext/2014/11000/tracheostomy_care.8.aspx#:~:text=Nursing%20care,-Most%20nurses%20were&text=(See%20Tracheostomy%20tubes.),filtering%2C%20and%20humidifying%20inspired%20air.
- Ninan, A., Grubb, L. M., Brenner, M. J., & Pandian, V. (2023). Effectiveness of interprofessional tracheostomy teams: A systematic review. Journal of Clinical Nursing, 32, 6967–6986. https://doi.org/10.1111/jocn.16815. Retrieved January 18, 2024 from https://onlinelibrary.wiley.com/action/showCitFormats?doi=10.1111%2Fjocn.16815.
- Image: Decannulation pathway. Retrieved from https://rc.rcjournal.com/content/respcare/55/8/1076.full.pdf
- Oxford Medical Dictionary. https://www.health.harvard.edu/a-through-c.
- Medline Plus Tracheostomy 2023. Retrieved from https://medlineplus.gov/ency/article/002955.htm
- National Library of Medicine. Tracheostomy Care. (2022). https://medlineplus.gov/ency/patientinstructions/000076.htm
- Greenwood JC, Winters ME. Tracheostomy care. In: Roberts JR, Custalow CB, Thomsen TW, eds. Roberts and Hedges’ Clinical Procedures in Emergency Medicine and Acute Care. 7th ed. Philadelphia, PA: Elsevier; 2019: chap 7.
Disclaimer:
Use of Course Content. The courses provided by NCC are based on industry knowledge and input from professional nurses, experts, practitioners, and other individuals and institutions. The information presented in this course is intended solely for the use of healthcare professionals taking this course, for credit, from NCC. The information is designed to assist healthcare professionals, including nurses, in addressing issues associated with healthcare. The information provided in this course is general in nature and is not designed to address any specific situation. This publication in no way absolves facilities of their responsibility for the appropriate orientation of healthcare professionals. Hospitals or other organizations using this publication as a part of their own orientation processes should review the contents of this publication to ensure accuracy and compliance before using this publication. Knowledge, procedures or insight gained from the Student in the course of taking classes provided by NCC may be used at the Student’s discretion during their course of work or otherwise in a professional capacity. The Student understands and agrees that NCC shall not be held liable for any acts, errors, advice or omissions provided by the Student based on knowledge or advice acquired by NCC. The Student is solely responsible for his/her own actions, even if information and/or education was acquired from a NCC course pertaining to that action or actions. By clicking “complete” you are agreeing to these terms of use.
➁ Complete Survey
Give us your thoughts and feedback
➂ Click the Green MARK COMPLETE Button Below
To receive your certificate
